


The Chemainus top is a pattern from Itch to Stitch designed for woven fabrics and the style ticks so many boxes for me. The flowy relaxed fit means it’s very appropriate for delicate fabrics and they are my favorites to sew with.
I have been a pattern tester for Itch to Stitch since 2017 and the designs, quality and superb sewing techniques are impossible to resist for me. I jumped at the chance to test the Chemainus top.

*The Chemainus top is 20% OFF through the 8th of July 2020. Get yours HERE if you are inspired by my work and versions 🙂 Thank you!


The Chemainus top is designed for woven fabrics, It has a round neckline finished with bias binding and a long half placket with 5 buttons. There is a center front and center back pleat that add to the ease at the hips. The sleeves are dolman style with a cuff and are easier to sew than set in sleeves. The overall length is good, not short at all and the hem is curved, shirttail style. For added interest, there are shoulder insets.

All these features make using a contrast fabric very appealing: shoulder insets, binding, half placket and cuffs will look very good in a solid if the main fabric is a print.

Designed for light weight woven fabrics. The style is relaxed and I have first choices and second choices. This is of course personal preference and I am only stating my opinion here.

My 1st choice: These fabrics are light and drape beautifully. In my opinion these are the better choices because the pleats in the top will fall nicely and not stick out in a structured way. Relaxed fit styles usually look better on the body in very light and drapy fabrics like these.
Second choices: Whist these fabrics are also light weight wovens, they are stiff and will not drape. The structure of the pleats and positive ease will be very evident with these fabrics. They would not be my choice.
However, I would chose one of these aforementioned to cut the half placket, binding, cuffs and shoulder insets. Mixing a light structured fabric with a light flowy fabric would make the sewing construction easier and give some structure to these features, whilst keeping the flowy look of the design intact.
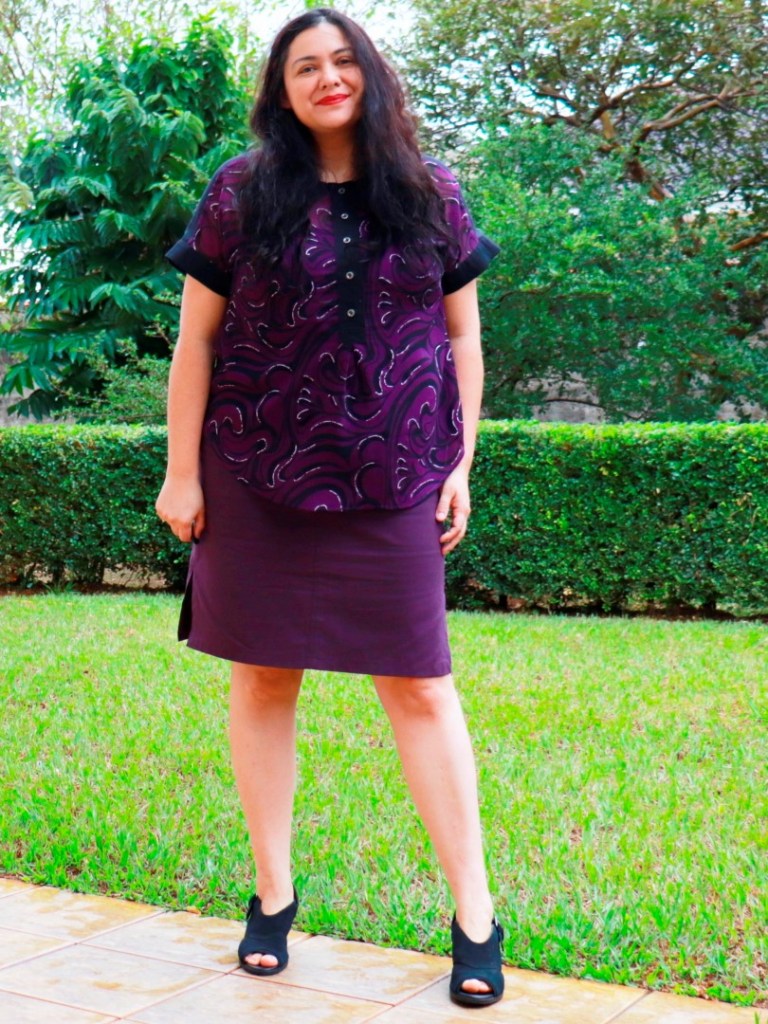
My Choices: I made two Chemainus tops, once with a dizzy print silky satin and the other with a purple crinkle chiffon. I chose these light fabrics for the main pieces, front and back. For the shoulder insets, cuffs, binding and placket, I chose a plain black quilters cotton.


Sizes are available from 00-20 US and there are individual sewing bust cup sizes from A-DD. For a pattern designed for wovens, this is GOLD and very appreciated. To see a video on my channel that discusses the difference between sewing bust cup sizes and bra cup sizes, see it HERE.
This is the body measurement chart below.

Next is the finished garment measurement chart. You will observe the relaxed fit described is evidenced by the positive ease.

I chose a size 12, although my body measurements put me in a size 12 and needing to blend to a 14 at the hips. The positive ease is approximately 10″ at the hips, so sewing a straight size was a possibility this time. This resulted in 7″ positive ease at the hips.
The length of the garment is clearly stated for my size at 27 1/8″ and that is a great length for me. I usually adjust for length because I am taller than the 5ft 6″ the pattern is drafted for. This time, I didn’t think it necessary to add length. I am 5 ft 8″.
The only fit adjustment I made was lower the bust dart by 3/4″ and this is a very common adjustment for me and consistent with this brand.


- The seam allowance throughout is 1/2″, except for the binding and the neckline, where it is 3/8″
- The front and back necklines need to be stay stitched early in the process.
- The center front pleat is the first technique to complete in this pattern.
- The shoulder insets as sewn to complete the neckline, and then the binding is completed.
- The binding is finished with “stitch in the ditch” on the right side of the garment
- The placket is cut with the main fabric RIGHT SIDE UP and the marks are done on the right side of the fabric. They need to be erasable as the vertical lines are pressed in towards the wrong side of the fabric.
- I recommend block fusing the placket to conserve the shape/size of the piece.
- The half button placket is not as difficult as you may think! the instructions are marvelous.
- I prefer to sew the buttonholes on the wearer’s right side of the placket before completing the X type reinforcement on the bottom of the placket. There is easier accessibility to the last buttonhole, specifically.

- The front and back pleats cannot be eliminated without compromising the fit of the garment. I would not attempt this unless you are have advanced pattern cutting experience.
- The hem is curved. The total hem is 1/2″ and its a very appropriate depth.
- The hem is done on the front and back separately BEFORE sewing the side seams. I am not a fan of this technique, though it might be easier to achieve the curve on the side like this. I will always prefer a hem sewn on the round and it is possible, with care.
- The cuffs are not a rectangle piece, they have an angle at the seam that will meet the underarm seam. They tend to “stick out” a tad and that is common in dolman sleeve types.
To see a comprehensive pattern review, how to sew the front pleat, binding, half button placket and the close up details of both my versions and look-books, visit my sewing YouTube channel and the video below:

I made two versions, both with delicate fabrics and interesting prints. They have no hacks or changes. I batch cut all the contrast black cotton pieces as I always knew I would make two versions.


This is a Silky Satin with a very dizzy print and I actually felt strange when cutting and sewing it. Believe me! The black contrast breaks up the crazy print and gives an interesting vertical detail that pops. I found 5 metal silver buttons and love them there.


This crinkle chiffon is obviously very light and very sheer. I have a black fitted cami top underneath. This one is even flowier than the satin version.


I chose this purple chiffon because I recently made a purple Danube skirt, also from Itch to Stitch and am building this color in my wardrobe, because I LOVE it. These two garments go perfectly together.
See the video all about the Danube Skirt on my channel HERE.


You may wonder how difficult is it to manage these fabrics? I have been sewing slippery silky flowy fabrics for decades and am always drawn to them because they are beautiful and hang beautifully making any style even more special and feminine. I have a video on my video where I share ALL my SECRETS to cutting and sewing these fabrics. I was actually cutting the Purple Chemainus top to demonstrate many practical aspects in this video. You won’t want to miss this video full of footage. See below:
I really enjoyed sewing both my Chemainus tops and have already altered the pattern to make a lengthened dress version hack. I plan to do this with a beautiful rayon. Watch this space!
I recommend this pattern for the adventurous beginner who wants a nice challenge of a half placket. This is an amazing opportunity to do this for the first time. The instructions are wonderful and include step by step diagrams and clear words, plus, the video I produced with the technique simplified will support you too. You’ll be proud of your achievement and your beautiful top, for sure.
*The Chemainus top is 20% OFF through the 8th of July 2020. Get yours HERE if you are inspired by my work and versions 🙂 Thank you!

DISCLAIMER: I was provided the pattern without cost, as a pattern tester, in exchange for sewing a muslin, providing feedback on instructions and fit. I Purchased my own fabric for both versions.
I have affiliate links in this post to the pattern company and the pattern. If you click on these links, at no cost to you, I receive a small commission that helps finance my sewing, blog and Youtube channel.
HOW TO SUPPORT MY WORK:
I spend a lot of my time sewing, filming/editing videos, writing and taking photos for both my Youtube channel and blog and if you love what I do and consider my work valuable for your own sewing, you can support me financially in a non-committal manner by purchasing me a ”coffee” through Ko-Fi here. $3 gets me one cup of “coffee”.


Did you love this post?
Your generous donation supports the cost required to keep sharing sewing tips and resources with you. Thank you.
5.00 $
If you would like to support my work in a continual basis, you are welcome to pledge on my Patreon Page where I offer rewards in tiers. Lots of extra exclusive sewing content awaits and a chance for us to connect more 🙂

Categories: Pattern Reviews, Sewing techniques
Hi Karina, can I laud any more praise for your fantastic sewing and teaching. Again I second everything that people say over on your channel. You teach very well and I am pleased to say I made a chiffon midi dress on your advice of working with this kind of material; and I enjoyed every minute of it. I hand basted ever thing and it made a world of difference. Thank you so much for the jump start.
I’m so happy for you! It’s an honor to have inspired you to take this awesome leap.